<?xml version="1.0" encoding="UTF-8"?>
<!--Generated by Squarespace V5 Site Server v5.13.156 (http://www.squarespace.com) on Sun, 19 May 2013 11:50:11 GMT--><feed xmlns="http://www.w3.org/2005/Atom" xmlns:dc="http://purl.org/dc/elements/1.1/"><title>Main</title><subtitle>Main</subtitle><id>http://chasingtrons.com/main/</id><link rel="alternate" type="application/xhtml+xml" href="http://chasingtrons.com/main/"/><link rel="self" type="application/atom+xml" href="http://chasingtrons.com/main/atom.xml"/><updated>2012-11-04T14:47:34Z</updated><generator uri="http://five.squarespace.com/" version="Squarespace V5 Site Server v5.13.156 (http://www.squarespace.com)">Squarespace</generator><entry><title>USB Toolbox</title><category term="Cocoa"/><category term="FX2LP"/><category term="LibUSB"/><category term="OS X"/><category term="software"/><id>http://chasingtrons.com/main/2012/10/19/usb-toolbox.html</id><link rel="alternate" type="text/html" href="http://chasingtrons.com/main/2012/10/19/usb-toolbox.html"/><author><name>Jay Kickliter</name></author><published>2012-10-19T14:38:30Z</published><updated>2012-10-19T14:38:30Z</updated><content type="html" xml:lang="en-US"><![CDATA[<h3>About</h3>

<p>Since I&#8217;ve gotten into USB design using Cypress&#8217; FX2LP chip, I&#8217;ve mainly been using command line tools to do control/bulk transfers. That gets old after a while, so I wrote this application. I&#8217;m not application developer, nor have any desire to be one. I only write one if it&#8217;ll help with some physical device I&#8217;m working on. So, USB Toolbox isn&#8217;t finished, and probably never will be. I&#8217;m only writing a post about it to target the very small audience of people who google some variation of &#8220;libusb &amp; Cocoa&#8221;.</p>

<h3>Screenshot</h3>

<p><a href="http://www.flickr.com/photos/jaykickliter/8102771234/" title="USBToolBox by Jay Kickliter, on Flickr"><img src="http://farm9.staticflickr.com/8464/8102771234_7d82f8f04e_z.jpg" width="640" height="414" alt="USBToolBox"></a></p>

<h3>Details</h3>

<p>I post more details when add a couple features.</p>

<h3>Source</h3>

<p>I put the source on <a href="https://github.com/JayKickliter/USB-Toolbox">github</a>. Be warned, I&#8217;m new to git, and as of this post I think I may have messed up the repository. The source may be behind. If you have git skills, and need some pointers on getting started with USB, lets trade lessons:)</p>
]]></content></entry><entry><title>lsusb on OS X</title><id>http://chasingtrons.com/main/2012/10/4/lsusb-on-os-x.html</id><link rel="alternate" type="text/html" href="http://chasingtrons.com/main/2012/10/4/lsusb-on-os-x.html"/><author><name>Jay Kickliter</name></author><published>2012-10-04T14:12:39Z</published><updated>2012-10-04T14:12:39Z</updated><content type="html" xml:lang="en-US"><![CDATA[<p>I&#8217;ve starting down the long dark path of embedded USB design. It&#8217;s been tough, but there are some good examples out there.</p>

<p>But back to the subject of this post. I find it annoying to have to go to <em>About This Mac</em> every time I want to see what USB devices are connected. I would like an equivelent of the Linux command line tool <code>lsusb</code>. Then I read somewhere the OS X command <code>system_profiler SPUSBDataType</code> gives you the same data that you will find in <em>About This Mac</em>. To make it easy to remember, I added this line to my bash profile (<strong>~/.profile</strong>):</p>

<pre><code>alias lsusb='system_profiler SPUSBDataType'
</code></pre>

<p>Now, all I have to do is type <code>lsusb</code> in the terminal to list all the USB devices connected to my computer. I&#8217;m sure it is possible to install the actual <code>lsusb</code> command on my computer, but this works fine for me.</p>
]]></content></entry><entry><title>Raspberry Pi Use Case: Subversion &amp; Airplay</title><category term="airplay"/><category term="airtunes"/><category term="computers"/><category term="raspberry pi"/><category term="shairtunes"/><category term="subversion"/><id>http://chasingtrons.com/main/2012/10/3/raspberry-pi-use-case-subversion-airplay.html</id><link rel="alternate" type="text/html" href="http://chasingtrons.com/main/2012/10/3/raspberry-pi-use-case-subversion-airplay.html"/><author><name>Jay Kickliter</name></author><published>2012-10-03T16:58:21Z</published><updated>2012-10-03T16:58:21Z</updated><content type="html" xml:lang="en-US"><![CDATA[<p>I bought a <a href="www.raspberrypi.org">Raspberry Pi</a> this past weekend at Maker Faire NYC. I didn&#8217;t really know what to do with it, but at $40 I figured I wouldn&#8217;t have much to lose.</p>

<p>The next day I received an email from my <a href="http://en.wikipedia.org/wiki/Apache_Subversion">Subversion</a> service that my payment didn&#8217;t go through. So first use, I set up a subversion server on the Pi. In time I will transfer my repositories from the web to the Pi and cancel my commercial Subversion account.</p>

<p>Next, I had run out of ethernet ports on my router. So, in order to use the Pi I had to disconnect something. Well, my AirPort Express was using a port. Since I already have an AirPort Extreme, the Express is only being used for Airplay, a service that lets you select where to play your music from your Mac or iDevice. I discovered that there&#8217;s an opensource project called Shairtunes (Airplay used to be named AirTunes) which mimics an Airplay device. So I followed <a href="http://trouch.com/2012/08/03/airpi-airplay-audio-with-raspberry/">these steps</a> and had a replacement for my AirPort express. I did run into one problem, Shairtunes wouln&#8217;t run and gave this error: <code>Can't locate Net/SDP.pm in @inc</code>. You need to install the missing code. I don&#8217;t even know what it&#8217;s for, but the solution is:</p>

<pre><code># for some reason the fix doesn't work 
# unless you run as the superuser, plain sudo din't work
sudo su               
cpan install Net::SDP # just say yes to everything
</code></pre>

<p>I won&#8217;t repeat all the install steps since there are so many Raspberry Pi tutorials out there. But, if run into a snag leave a comment.</p>

<p>Overall, I&#8217;m very happy I picked up the Raspberry Pi, even if one of my use cases for the Pi is a solution to a problem it created.</p>
]]></content></entry><entry><title>FPGA DSP</title><id>http://chasingtrons.com/main/2012/7/3/fpga-dsp.html</id><link rel="alternate" type="text/html" href="http://chasingtrons.com/main/2012/7/3/fpga-dsp.html"/><author><name>Jay Kickliter</name></author><published>2012-07-03T16:46:55Z</published><updated>2012-07-03T16:46:55Z</updated><content type="html" xml:lang="en-US"><![CDATA[<p><iframe width="640" height="480" src="http://www.youtube.com/embed/qeUTMRiudCk" frameborder="0" allowfullscreen></iframe></p>
<p>This is basically the &#8220;hello world&#8221; of DSP on an FPGA. I&#8217;m including source code, but no schematics, since it&#8217;s all on a prototyping board. I&#8217;m using a Digilent Nexys2 board with two of their periphial boards (PMOD&#8217;s), a 12 bit SPI ADC, and a 16 it I2S ADC. The audio can take two paths depending on switch positions, either ADC -&gt; DAC, or ADC -&gt; FIR Low Pass Filter -&gt; DAC. The audio is coming from my computer in analog form, so this music has seen a lot of conversions before it leaves the speakers. But it still sounds pretty good.</p>
<p><a href="http://chasingtrons.com/storage/downloads/ADC_to_DAC.zip" target="_blank">Download Source</a></p>
<p>&nbsp;</p>
]]></content></entry><entry><title>eBay Find</title><category term="ebay"/><category term="electronics"/><category term="electronics"/><category term="parts"/><category term="salvage"/><id>http://chasingtrons.com/main/2012/6/29/ebay-find.html</id><link rel="alternate" type="text/html" href="http://chasingtrons.com/main/2012/6/29/ebay-find.html"/><author><name>Jay Kickliter</name></author><published>2012-06-29T19:15:00Z</published><updated>2012-06-29T19:15:00Z</updated><content type="html" xml:lang="en-US"><![CDATA[<p><a href="http://www.flickr.com/photos/jaykickliter/7496224516/" title="eBay Find by Jay Kickliter, on Flickr"><img src="http://farm8.staticflickr.com/7122/7496224516_72a74eb74e.jpg" width="640" height="640" alt="eBay Find"></a></p>

<p>I bought two of these boards off eBay for $10. Like an idiot I didn&#8217;t notice the seller had &#8216;make an offer&#8217; enabled; I&#8217;d have bought more and probably paid less. I&#8217;m interested in the DAC and a couple other parts. Too bad that Spartan is a BGA, since I don&#8217;t have any <a href="http://youtu.be/VTAU647jzzk">reballing</a> equipment.</p>

<p>I&#8217;d love to know what they were originally for. Have any idea? There&#8217;s an Analog Devices <a href="http://www.analog.com/static/imported-files/data_sheets/AD9761.pdf">AD9761 TxDAC</a>, so that leads me to believe the board was used for some RF purpose. But there&#8217;s no RF connectors, so I could be wrong.</p>

<h3>Parts list:</h3>

<pre><code>Xilinx Spartan 300 Series FPGA XC2S300E-FGG456 FBGA456
(8x) Intel 128Mbit FLASH 28F128J3D75 EZBGA64-3
Xilinx PROM XC18V02 SERIAL OR PARALLEL EEPROM,PLCC44 
PHILIPS / NXP 8051 MCU P89C662HFA 8-BIT MICROCONTROLLER,PLCC44 
PHILIPS / NXP USB peripheral controller with parallel bus PDIUSBD12 TSSOP28
PHILIPS / NXP Hex Inverter 74HC04D SO14 
MAX232A, MULTI-CHNL RS-232 DRIVER/RCVR, SO1
CYPRESS CY7C1399B,32K X 8 SRAM,TSOP28 256K SRAM
AD9761 / TxDAC+ 9761ARS SSOP28-2 Dual channel, 10-bit CMOS DAC, 40 MSPS
XTAL 21.524475Mhz HC49
XTAL 18Mhz MA-506
LT1762, ADJ LOW NOISE LDO REGULATOR,SSO8 
LT1762, 5V LOW NOISE LDO REGULATOR,SSO8
LT1767, ADJ STEP-DOWN REGULATOR,SSO8
</code></pre>
]]></content></entry><entry><title>Creating Xilinx FIR '.coe' File with Octave</title><category term="coe file"/><category term="electronics"/><category term="filter"/><category term="fir"/><category term="fpga"/><category term="fpga"/><category term="xilinx"/><id>http://chasingtrons.com/main/2012/6/29/creating-xilinx-fir-coe-file-with-octave.html</id><link rel="alternate" type="text/html" href="http://chasingtrons.com/main/2012/6/29/creating-xilinx-fir-coe-file-with-octave.html"/><author><name>Jay Kickliter</name></author><published>2012-06-29T13:00:05Z</published><updated>2012-06-29T13:00:05Z</updated><content type="html" xml:lang="en-US"><![CDATA[<p>Tired of cutting and pasting your Finite Impulse Response filter coefficients from Octave to Xilinx ISE? Probably not if you&#8217;re a pro and know what you&#8217;re doing. But I have been doing it the inefficient way, so I made this Octave script. It should also work with MATLAB with a little modification.</p>
<p>You enter the sampling rate, lowpass cutoff frequency, filter size, and file name. It spits out a &#8216;.coe&#8217; file you can use with the Xilinx FIR Compiler to create an FIR low pass filter.</p>
<p>If you make any useful modifications please let me know and I&#8217;ll post it here.</p>
<p><a href="http://chasingtrons.com/storage/downloads/XilinxFIRCoefficientsCreator.m">Download Source</a></p>
]]></content></entry><entry><title>What my bench looks like after a little work</title><id>http://chasingtrons.com/main/2012/6/25/what-my-bench-looks-like-after-a-little-work.html</id><link rel="alternate" type="text/html" href="http://chasingtrons.com/main/2012/6/25/what-my-bench-looks-like-after-a-little-work.html"/><author><name>Jay Kickliter</name></author><published>2012-06-25T20:12:23Z</published><updated>2012-06-25T20:12:23Z</updated><content type="html" xml:lang="en-US"><![CDATA[<p>I&#8217;m frequently accused of being a neat freak. I clean my bench (in my living room) every day. But no matter what I do this is what it looks like after just a couple hours of working on a project. In this case, I was just messing around doing realtime DSP on an FPGA.</p>
<p><a title="My Bench by Jay Kickliter, on Flickr" href="http://www.flickr.com/photos/jaykickliter/7447021828/"><img src="http://farm9.staticflickr.com/8145/7447021828_d4bd018dc3_z.jpg" alt="My Bench" width="640" height="480" /></a></p>
]]></content></entry><entry><title>Television + FPGA + Verilog</title><category term="electronics"/><category term="fpga"/><category term="ntsc"/><category term="verilog"/><id>http://chasingtrons.com/main/2012/6/14/television-fpga-verilog.html</id><link rel="alternate" type="text/html" href="http://chasingtrons.com/main/2012/6/14/television-fpga-verilog.html"/><author><name>Jay Kickliter</name></author><published>2012-06-14T20:14:42Z</published><updated>2012-06-14T20:14:42Z</updated><content type="html" xml:lang="en-US"><![CDATA[<p><span class="thumbnail-image-float-right ssNonEditable"><span><a href="javascript:showFullImage('/display/ShowImage?imageUrl=%2Fstorage%2Fimg%2Fphoto.JPG%3F__SQUARESPACE_CACHEVERSION%3D1339712225183',1523,1847);"><img src="http://chasingtrons.com/storage/thumbnails/3666403-18770231-thumbnail.jpg?__SQUARESPACE_CACHEVERSION=1339712229560" alt=""/></a></span></span></p>

<p>I love when people share their code on the internet, but have a complaint: short, obscure variable names. Also, a lack of whitespace. Most engineers aren&#8217;t the best at documentation, myself included. But I try my best to make my code very readable. It can be a pain type out 20 character variable names, but that&#8217;s where code completion, along with regular expressions and find &amp; replace come in.</p>

<p>
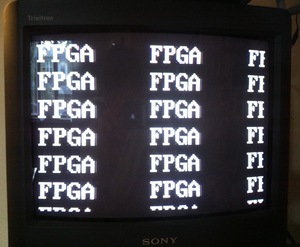
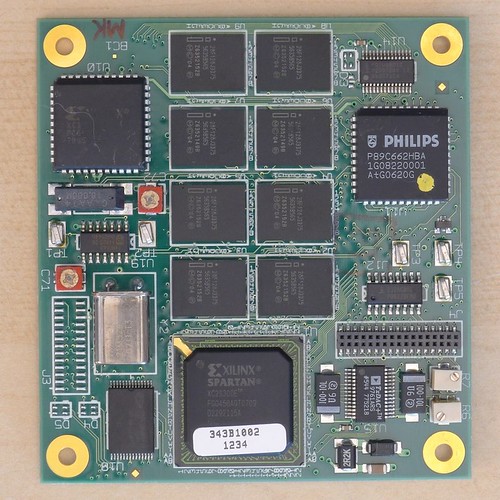
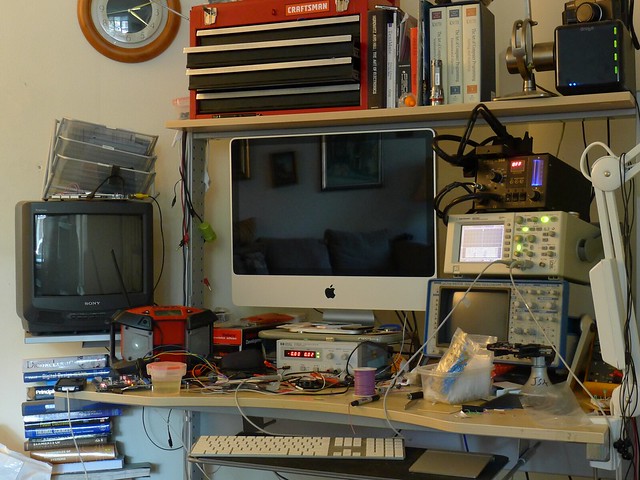
Surprisingly, unreadable code recently led me to do something I don&#8217;t often do: start from scratch. I was looking for a Verilog module to generate an NTSC signal, which is the analog television standard in North America and a few other places. There were plenty of VHDL snippets out there, and one or two Verilog, but I couldn&#8217;t make heads or tails of what the author was doing with it. So I got on Google and and found just about every document I could on the NTSC standard until it finally sunk in. I was just starting to get the hang of Verilog before I started this project, but having to go from timing specifications to an FPGA (Field Programmable Gate Array) really made it all sink in. The irony is that I really didn&#8217;t even want to generate a TV signal. I wanted to output video from my <a href="http://www.digilentinc.com/Products/Detail.cfm?NavPath=2,400,789&amp;Prod=NEXYS2" target="_blank" class="offsite-link-inline">prototyping board</a> to a VGA display, but I don&#8217;t have one. Normally they&#8217;re a dime a dozen on trash days here in NYC, until I needed one. But, I do have a small TV a neighbor threw out a few months ago.</p>

<p>So here I&#8217;m sharing my project. At the heart is a file named <code>interlaced_ntsc.v</code>, which generates 3 bit monochrome video signal. There&#8217;s one bit of code I borrowed, another file named <code>8x16_font_rom.v</code>. It&#8217;s just a pixel lookup table for all the ASCII characters. Making a font rom is tedious, so I don&#8217;t feel bad about using that. The top project file is <code>top_ntsc.v</code>. It&#8217;s included only as reference to complete working project. You don&#8217;t need to use it unless you&#8217;re new to FPGA&#8217;s or Verilog.</p>

<p>Here&#8217;s the instantiation template for my NTSC code. There&#8217;s a few signals not listed, which are only needed for debugging with an oscilloscope. They&#8217;re documented in the code.</p>

<div><code>interlaced_ntsc.v</code> instantiation template</div>
<div class="content-scroll">
<pre><code>
interlaced_ntsc instance_name (                
    .clk( clk ),                              // input: 50 MHz clock input     
    .pixel_data( pixel_data ),                // input: brightness of pixel 0..5
    .pixel_y( pixel_y ),                      // output: current pixel's y coordinate (row number)
    .pixel_x( pixel_x ),                      // output: current pixel's x coordinate
    .pixel_is_visible( pixel_is_visible ),    // output: high when not a sync signal, but not necessarily visible on the screen
    .ntsc_out( ntsc_out )                     // output: the TV signal, fed to a 3 bit r2r DAC
    );                                   
</code></pre>
</div>

<p>The 50 MHz clock requirement is baked into the code right now. I&#8217;m trying to figure a way to improve that. If you need to use a different clock, adjust the timing constants in <code>interlaced_ntsc.v</code>. They&#8217;re pretty obvious.</p>

<p>That&#8217;s it. I&#8217;m the first one to admit that I&#8217;m frequently a hypocrite, so if there&#8217;s something you don&#8217;t understand, or needs more comments, please let me know. And if you see a way to improve it, definitely leave a comment.</p>

<p><a href="http://chasingtrons.com/storage/downloads/NTSC_Verilog.zip">Source Code</a></p>
<p>Source: NTSC demystified - B&amp;W Video and Sync - Part 1 (http://gvworks.blogspot.com/2011/04/ntsc-demystified-part-1-b-video-and.html)<br/>Source: National Television Systems Committee Video Display Signal IO (http://www.sxlist.com/techref/io/video/ntsc.htm )<br/>Source: Monochrome Composite Video (http://www.batsocks.co.uk/readme/video_timing.htm )<br/>Source: Image showing interlacing (http://www.sensorcentral.com/vision/img/ntsc_standards.gif)<br/>Related: NTSC (http://ntsc-tv.com/index.html )</p>]]></content></entry><entry><title>CR2450 Coin Cell Charger</title><category term="CR2450"/><category term="Charger"/><category term="LIR2450"/><category term="MCP73832"/><category term="Sparkfun"/><category term="cell"/><category term="coin"/><category term="electronics"/><id>http://chasingtrons.com/main/2012/3/26/cr2450-coin-cell-charger.html</id><link rel="alternate" type="text/html" href="http://chasingtrons.com/main/2012/3/26/cr2450-coin-cell-charger.html"/><author><name>Jay Kickliter</name></author><published>2012-03-26T12:23:00Z</published><updated>2012-03-26T12:23:00Z</updated><content type="html" xml:lang="en-US"><![CDATA[<p><span class="thumbnail-image-float-right ssNonEditable"><span><a href="javascript:showFullImage('/display/ShowImage?imageUrl=%2Fstorage%2Fprojects%2Fcr2450-charger%2FLIR2450%2520Charger%25201.jpg%3F__SQUARESPACE_CACHEVERSION%3D1332865322014',1024,1024);"><img src="http://chasingtrons.com/storage/thumbnails/3666403-17343701-thumbnail.jpg?__SQUARESPACE_CACHEVERSION=1332865325479" alt="" /></a></span></span></p>
<p>This project was mainly a way for me to learn Altium Designer. It started out with me just messing around, but slowly a nice looking board started to emerge. So, I sent the design off to <a class="offsite-link-inline" href="http://www.goldphoenixpcb.com/">Gold Phoenix</a>&nbsp;and got back 90 boards. It&#8217;s a charger for a single CR2450 (LIR2450 to be exact) coin cell. CR normally applies to primary cells (non-rechargeable). I&#8217;m guessing LIR stands for Lithium Ion Rechargeable. I bought a few of these cells from <a class="offsite-link-inline" href="http://www.sparkfun.com/products/10319">SparkFun</a> a while back, but never really used them because I didn&#8217;t have a convenient way to charge them. Sparkfun&nbsp;sells a single-cell lithium <a class="offsite-link-inline" href="http://www.sparkfun.com/products/10161">charger</a> based of the MAX1555 IC, but that chip has been hard to source lately. Regardless, its charging current is too high for this 110 mAH cell, and their board requires another <a class="offsite-link-inline" href="http://www.sparkfun.com/products/10495">daughterboard</a> to hold the coin cell.</p>
<p><span class="thumbnail-image-float-right ssNonEditable"><span><a href="javascript:showFullImage('/display/ShowImage?imageUrl=%2Fstorage%2Fprojects%2Fcr2450-charger%2FLIR2450%2520Charger.png%3F__SQUARESPACE_CACHEVERSION%3D1332869958543',1700,2200);"><img src="http://chasingtrons.com/storage/thumbnails/3666403-17344758-thumbnail.jpg?__SQUARESPACE_CACHEVERSION=1332869958544" alt="" /></a></span><span class="thumbnail-caption" style="width: 402px;">Schematic</span></span>This board is based around the <span><a class="offsite-link-inline" href="http://www.microchip.com/wwwproducts/Devices.aspx?dDocName=en026250">MCP73832</a></span>, which contains all the logic and active devices to charge a single lithium ion/polymer cell. It has multiple charge modes, including constant current which does the bulk of charging. R3 sets the constant current. I chose a resistance of 20k ohms, to get a constant current of 50 mA; that&#8217;s about the max charging current one should charge a 110 mAH battery at.</p>
<h3>Purchase</h3>
<p>Right now I&#8217;m only selling bare-boards, $5 each including shipping in North America. If there&#8217;s enough interest, I&#8217;ll sell fully populated boards. <a href="mailto:jay@kickliter.com ">Email me</a> to purchase one.</p>
<h3>Downloads<span style="font-weight: normal;">&nbsp;</span></h3>
<ul>
<li><a href="http://chasingtrons.com/storage/projects/cr2450-charger/Charger%20Altium%20Files.zip">Altium Files</a></li>
<li><a href="http://chasingtrons.com/storage/projects/cr2450-charger/LIR2450%20Charger.pdf">Schematic</a> (PDF)</li>
<li><a class="offsite-link-inline" href="https://docs.google.com/spreadsheet/ccc?key=0AjcbsjKRACvvdDFqUExwNDltbnVIbGZlT05XZExtSmc">Bill of Materials</a> (Google Doc)</li>
</ul>
<p>&nbsp;</p>
]]></content></entry><entry><title>Touch Enabled Business Card</title><category term="PCB"/><category term="business card"/><category term="cap sense library"/><category term="capacitive touch"/><category term="electronics"/><category term="microcontrollers"/><category term="msp430"/><id>http://chasingtrons.com/main/2012/3/2/touch-enabled-business-card.html</id><link rel="alternate" type="text/html" href="http://chasingtrons.com/main/2012/3/2/touch-enabled-business-card.html"/><author><name>Jay Kickliter</name></author><published>2012-03-02T13:25:00Z</published><updated>2012-03-02T13:25:00Z</updated><content type="html" xml:lang="en-US"><![CDATA[<p style="text-align: center;"><iframe width="640" height="360" src="http://www.youtube.com/embed/CpZpYUTCcuo" frameborder="0" allowfullscreen></iframe></p>
<p>My last business card was too expensive to give out, so I designed this one using a Texas Instruments MSP430. Combined with the chip&#8217;s <a class="offsite-link-inline" href="http://processors.wiki.ti.com/index.php/MSP430_Low_Cost_PinOsc_Capacitive_Touch_Overview" target="_blank">Pin Oscillator</a> hardware, and TI&#8217;s <a href="http://www.ti.com/tool/capsenselibrary">Capsense Library</a>, it wasn&#8217;t too difficult enabling capacitive touch. The great thing is that in software I can have it go into a low power mode and check the button every second or so. When it senses a a touch, it checks more frequently and only leaves low power mode to toggle an LED. I guess when you&#8217;re driving LED&#8217;s, low power sleep isn&#8217;t going to help much, but there are times when no LED&#8217;s are lit, even in the middle of a display routine.</p>
<p><span class="thumbnail-image-float-right ssNonEditable"><span><a href="javascript:showFullImage('/display/ShowImage?imageUrl=%2Fstorage%2Fprojects%2Fmsp430-business-card%2FCaptouchBusinessCard-Schematic.png%3F__SQUARESPACE_CACHEVERSION%3D1332957138079',1700,2200);"><img src="http://chasingtrons.com/storage/thumbnails/3666403-17363735-thumbnail.jpg?__SQUARESPACE_CACHEVERSION=1332957138080" alt="" /></a></span></span>I rushed to have these cards in hand before a job fair at my school. It was about two weeks between blank slate and getting the boards back from <a href="http://www.goldphoenixpcb.com/">Gold Phoenix</a> in China. I made a few dumb choices. Particularly, when laying out the board I have one of the LED&#8217;s on a different IO port than the rest. That makes it pain to write good code, since I have to do an if..then to determine which port to write to for a particular LED. Also, I didn&#8217;t lay out the LED&#8217;s in a sequential manner. Ideally LED1 should be attached to port 1.0, LED2 to 1.1, etc. I&#8217;m sure I had a reason at the time, most likely for cleaner routing, but that just made for uglier coding. Nevertheless, it works fine. Especially considering the prototype consisted of nothing more than one LED, and a penny with tape over it to substitute for the touch pad.&nbsp;</p>
<p>Even using much cheaper parts and smaller batteries, I&#8217;d say it&#8217;s still too expensive. The parts probably come to $2, but the board is almost $8. I remember Gold Phoenix being cheaper, but I may be wrong. $110 for 155 in<span style="vertical-align: super;">2</span> seems pretty good, until you start throwing in rounded corners, black soldermask, and very thin FR4. I think it&#8217;s about time to start looking for a new Chinese PCB manufacturer. Am I the only one receiving emails from Peak PCB? Has anyone else tried them?&nbsp;</p>
<h3>Downloads</h3>
<p>&nbsp;</p>
<ul>
<li><a href="http://chasingtrons.com/storage/projects/msp430-business-card/CapsenseBusinessCard-SourceCode-GCC.zip">Source Code</a>&nbsp;(mspgcc)</li>
<li><a href="http://chasingtrons.com/storage/projects/msp430-business-card/CapsenseBusinessCard-DesignFiles-Altium.zip">Design Files</a>&nbsp;(Altium)</li>
<li><a href="http://chasingtrons.com/storage/projects/msp430-business-card/CaptouchBusinessCard-Schematic.pdf">Schematic</a> (PDF)</li>
</ul>
<p>&nbsp;</p>
<p><br/><br/><br/><br/><br/><br/><br/><br/><br/></p>]]></content></entry></feed>